In this article we will discuss the vacuum levels of an acrylic vacuum chamber. This article also covers the leak rate or the leak tightness of the acrylic chamber. Additionally, we are going to recommend a rule of thumb used for vacuum pump selection based on the size of the vacuum chamber.
The Vacuum in a Chamber made from Acrylic

Altitude above Sea Level
Vacuum is the absence of air in your chamber and therefore the maximum amount of vacuum that can be pulled out of a chamber is equal to the ambient pressure or absolute pressure - which is pressure referenced to a perfect vacuum. The ambient pressure is altitude dependent. For example, at sea level, the maximum vacuum will be 760 Torr, in Omaha Nebraska (1000 feet altitude) it's 733 Torr, here in Salt Lake City, Utah (4000 feet altitude) it's 656 Torr, Denver Colorado (6000 feet altitude) is 609 Torr. The higher up you go above sea level, the lower the ambient pressure is. However, the ambient pressure varies based on the weather and the barometric pressure and therefore is not always the same.
Vacuum Permeability
Plexiglas is a polymer made from spaghetti-like molecular hydro-carbon chains. Due to the nature of the building blocks of acrylic, it makes it permeable to mostly water and air. This means that air (or other gasses) will flow through the acrylic chambers walls, albeit very slowly, if there is a pressure difference between the two sides.
The image shows an illustration of the gaseous behavior between acrylic, air, and vacuum. This is a simple illustration showing ambient air pressure on the left, the acrylic wall in the middle (black lines), the acrylic polymer chains (purple strings), vacuum on the right, and air molecules (blue). The red/dark blue arrow shows the movement of air through the acrylic wall and the outgassing of air when the vacuum is present inside the acrylic chamber.
Outgassing of Acrylic
In addition to permeability of acrylic, there is also a high percentage of air present (trapped) inside the acrylic itself (remember the spaghetti like structure?). The applied vacuum will pull the air out of the acrylic walls causing an out-gassing effect where constant air release from the acrylic chamber walls will decrease the vacuum levels of the vac chamber. Essentially, it is constantly fill the chamber will air molecules when there is a vacuum present in the acrylic vacuum chamber.
Evaporation of Constituents inside the chamber
Air is not the only contributor to the loss of vacuum inside an acrylic vacuum chamber; water, oil, and other compounds also contribute to the decrease in vacuum. Acrylic is hydrophilic, meaning that it will attract water making it stick to its surface. Once water comes into contact with the walls of the acrylic chamber, it will start to get absorbed by the acrylic; in fact, acrylic can absorb up to 0.4% water by weight. A 20 inch cube chamber, weighing roughly 150 pounds, could potentially absorb up to 0.6 pounds of water into its walls.
This absorbed water, as well as water droplets stuck onto the chamber wall, some which are sometimes not visible by the naked eye, will start to evaporate as the pressure inside the vacuum chamber is lowered below the vapor pressure of that liquid. This evaporating will contribute to the decrease in vacuum and will make it look like there is a leak. However, once all the present liquid has evaporated, a substantial decrease in the loss of vacuum will be observed.
Low and Medium Vacuum Applications
Due to the circumstances described above, Acrylic Vacuum Chambers are not intended for high vacuum applications; Plexiglas chambers are rather intended for the "low vacuum", "rough vacuum", or "medium vacuum" range; this is the vacuum range between atmospheric pressure 760 Torr and about 0.1 Torr.
However, the advantages of acrylic vacuum chambers is their cost effectiveness in a plethora of low vacuum applications such as degassing, altitude simulation, bubble leak testing, package testing, out-gassing, pressure drop tests, vacuum leak testing, gas separation, etc. In addition to its cost effectiveness, acrylic is a lot lighter than its metallic counterparts and acrylic chambers allow for full visibility of chamber interior during vacuum procedures.
What is the Lowest Vacuum an Acrylic Vacuum Chamber can achieve?
(Click on Image to Enlarge)
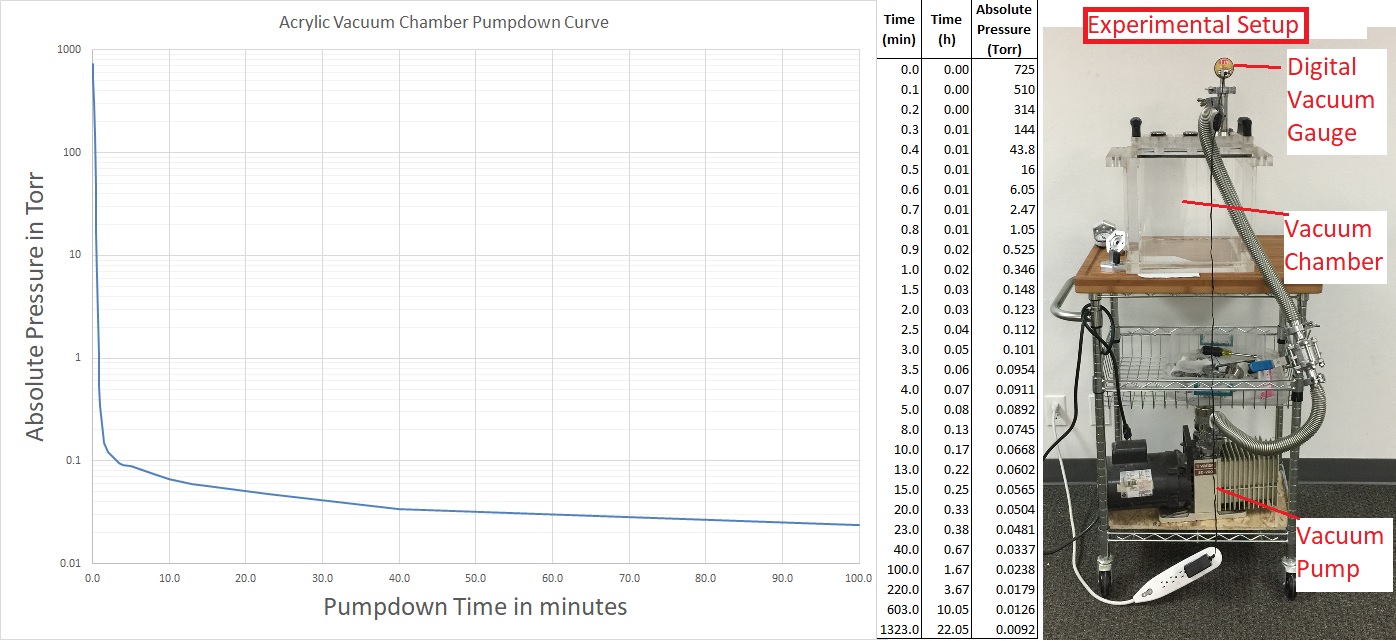
As of May 2009, Sanatron Acrylic Vacuum Chambers can achieve 0.0092 Torr (9.2 micron) after 22 hours of pumpdown utilizing a 10 inch cube vacuum chamber and a Varian SD-200 Rotary Vane Vacuum Pump.
The lowest vacuum any chamber can achieve, regardless of chamber building material, depends entirely on the vacuum pump used on the system. What the lowest achievable vacuum level of an acrylic vacuum chamber is something that we asked ourselves as well. In order to find out, we hooked up our beaten-up Varian SD-200 vacuum pump to our 10 inch cube acrylic vacuum chamber. The vacuum levels were measured with an Instrutech Stinger Digital Vacuum Gauge. What we wanted to know is what the vacuum would be after pulling a vacuum on the acrylic vacuum chamber for 24 hours.
The Vacuum Pump Rating for Varian SD-600 is a volumetric flow rate of 7CFM and an ultimate vacuum of 0.0015 Torr or 1.5 micron. This pump was hooked up with a 48 inch long NW25 Bellows hose to our severely beaten-up acrylic vacuum chamber. We say that because both the vacuum pump and the vacuum chamber has seen much better days and have been used in our shop extensively for quick tests and checks over the years.
In any case, we hooked it all up, and flipped the switch and opened the vacuum valve. We then observed the vacuum levels versus time. The results of the acrylic vacuum chamber vacuum pumpdown are shown below:
NOTE: This test was performed in May 2019 if you are reading this at a future date, our specs may have changed because we are constantly improving our manufacturing processes, our cutting and gluing techniques, and the way we make our chambers which is why our vacuum ratings keep improving.
As you can see, we were able to achieve 9.2 micron vacuum after about 24 hours of pump-down. This is a lot better than our vacuum rating of 75 micron on all our standard vacuum chambers. We under promise our specifications because of two things: 1. We want to discourage our clients from using this vacuum chamber in higher vacuum applications and 2. We like to under promise and overdeliver. In our experience it is always better to do so.
As the vacuum inside the vacuum chamber is pushed closer to the limit of the vacuum pump, it becomes exponentially more difficult to achieve the ultimate vacuum specified. In order to achieve a lower vacuum, we will have to use a more powerful or different pump. This is a test for another time. Be sure to visit back to see how low our vacuum chambers will go.
For now, let’s move on.
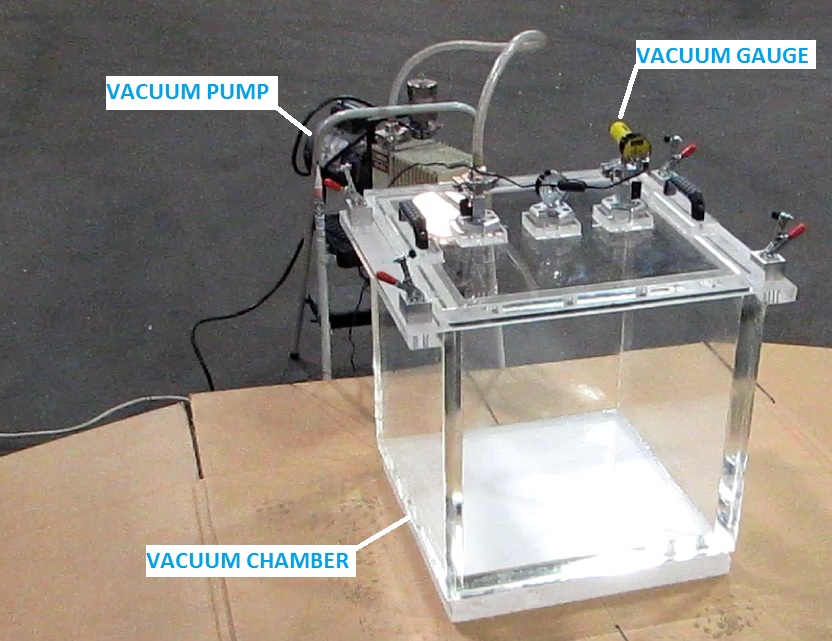
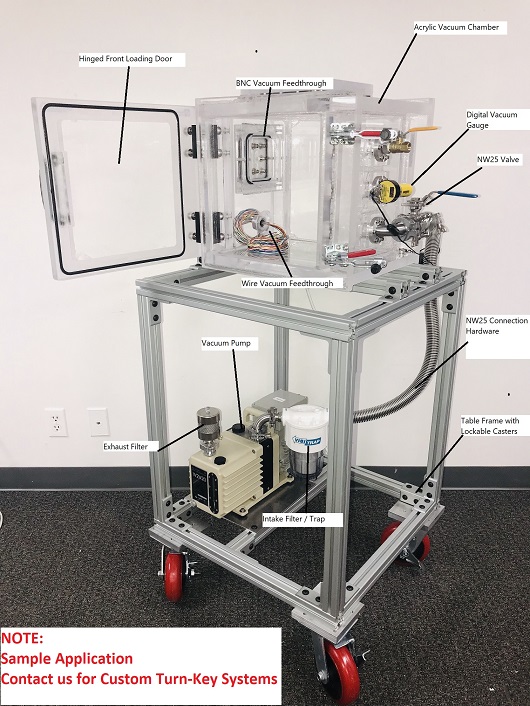
Vacuum Chamber and Pump and Gauge Experimental Setup
NOTE: This test was performed in August 2015, we have since gotten a lot better at designing, gluing, fabricating, assembling, and quality testing our vacuum chambers. Over the years, we have improved our glue epoxy formula, we have improved the way we put our chambers together. We have also improved our O-Ring Groove Technology which has enormously improved sealing.
Furthermore, we wanted to keep the test results, even though better technology has been developed, on our website in order to inform and educate you on our acrylic vacuum chambers.
In this example, we used our 18 inch cube inside dimensions vacuum chamber, top load, removable lid model. The pump for this test used was a Varian SD-200, 1/2 HP, 115/208-230 VAC, 1 PH, Vacuum Pump. Keep in mind that this pump has seen better days and therefore its pump down performance may be a little limited.
The goal was to determine the Initial Leak Rate or Leak Tightness of the Acrylic Chamber
Our test entailed determining the time it would take to pump down an 18 inch cube chamber. We were not only interested in the pump down time, but also the vacuum loss after this chamber has reached a desired vacuum level. Therefore we hooked everything up and opened the vacuum valve and started recording the absolute pressure in the chamber as shown in the image.

This test consisted of a total of 3 days where:
- Day 1: the chamber was pumped down to as low as it could go in one hour, the vacuum valve was closed, and the vacuum loss rate was measured. Then, the vacuum chamber was left closed to see how much vacuum would be lost in one day.
- Day 2: After about 21 hours of letting the chamber sit, the vacuum was recorded and the chamber was once again pumped down, but this time for about 3 hours. The vacuum valve was once again closed and the vacuum loss rate was measured. The vacuum chamber was left closed to see how much vacuum would be lost in one day.
- Day 3: The vacuum was measure and the chamber was brought back to ambient.
Day 1: Initial Vacuum Chamber Pumpdown
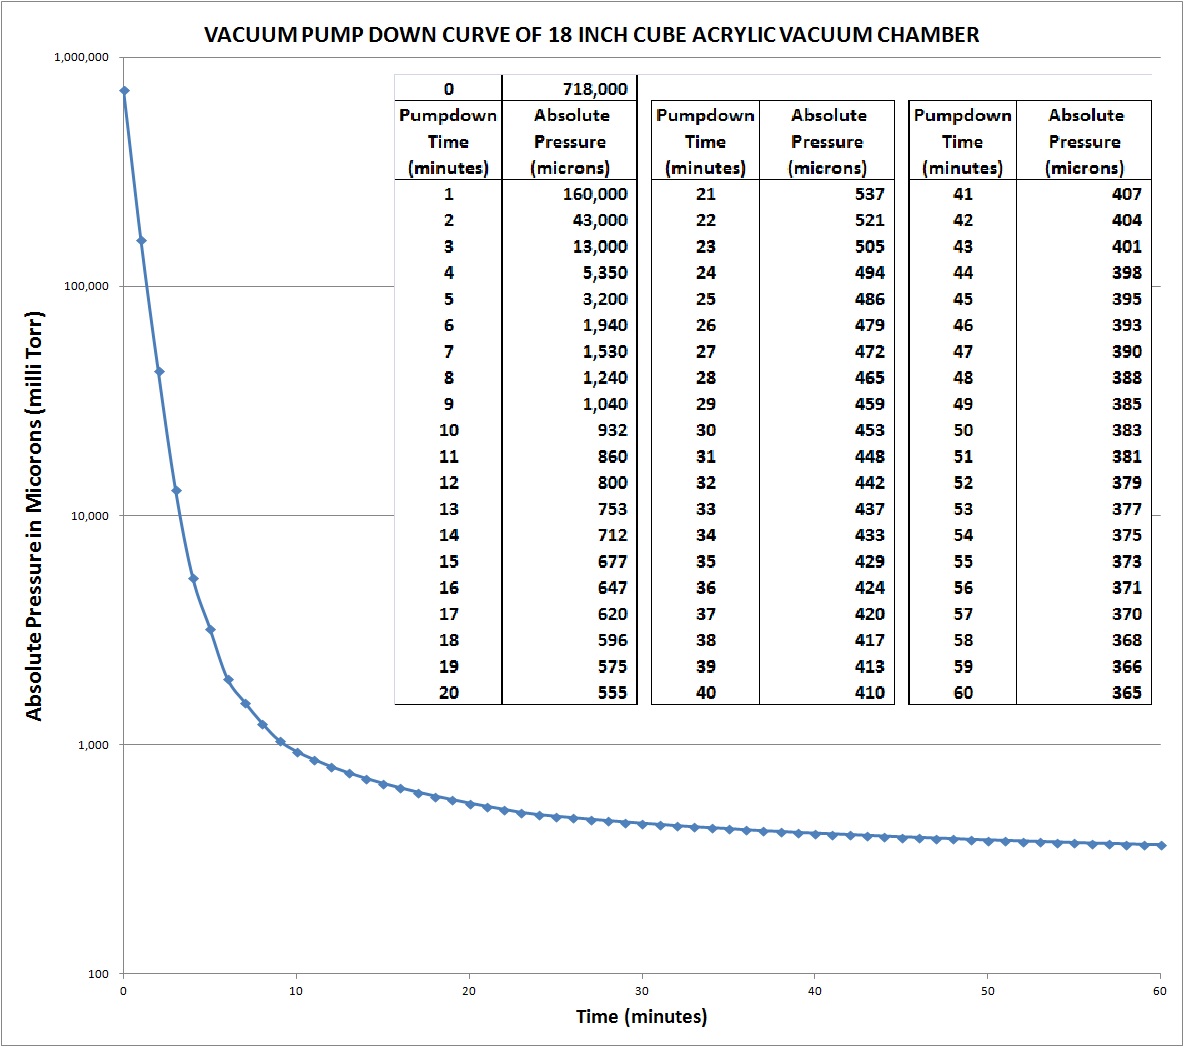
As you can see, within the first minute, about 80% of all air has been evacuated out of the chamber. At the second minute mark, 95% of all air has been taken out. At minute 3, 98% of air is gone out of the chamber.
However, the rate of vacuum removal starts to take a sharp decline. This is because The more air is taken out of the chamber, the harder it is for the pump to take additional air out. It takes about 10 minutes to get under 1 Torr and then about 23 minutes to get to 0.5 Torr (500 microns). It will take 37 more minutes to bring the absolute pressure down to 365 Microns.
This decreasing ability of the pump continues. My guess would be to use a curve fitting software to determine when this curve will level off. Eyeballing this trend it is safe to say that this chamber will not be able to go below 300 microns under these conditions. Well, this is not entirely true and the answer may surprise you - more on that later.
Leak Tightness without priming or conditioning on Day 1
At the 60 minute mark, we closed the valve and let the vacuum settle. The absolute pressure started to increase and chamber started to slowly loose vacuum. When the absolute pressure hit 400 microns, we started recording at every minute mark again.
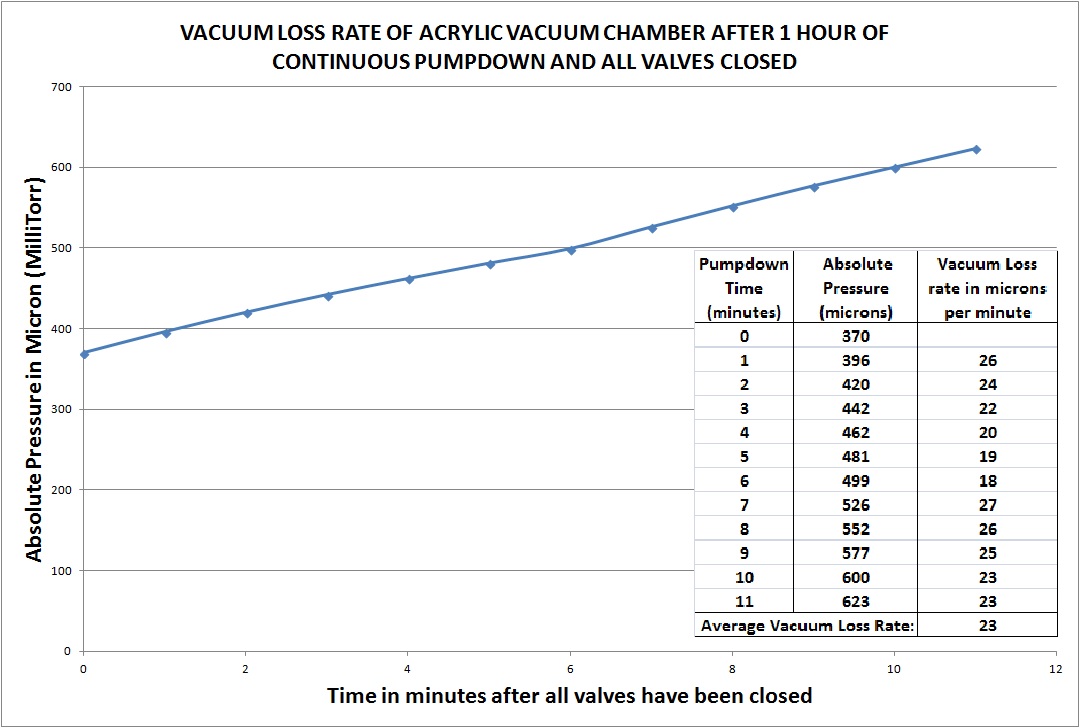
It is a given that no vacuum chamber in this world will have the ability to have a zero leak rate and therefore will immediately start to lose vacuum, once all valves are closed. As you can see, the absolute pressure will go from 370 Micron to 623 Micron in about 11 minutes; this corresponds to a total vacuum loss of 253 microns or a vacuum loss rate of 23 microns per minute (1.380 Torr per hour).
How long Will it take for an acrylic vacuum chamber to lose all its vacuum?
If we extrapolate based on our initial measurements, it looks like that at this vacuum loss rate, it will take about 520 hours or close to 22 days for this chamber to lose all its vacuum. Well, this is not exactly true, the chamber will not lose all its vacuum in 22 days, it will take even more than that; this is because the vacuum loss rate will continue to decrease.
What is the leak tightness of this chamber on Day 2?
We let this chamber sit for about 21 hours and when we came back, on day 2, the absolute pressure was 4120 Microns (4.12 Torr). This equals to an average vacuum loss of about 166 micron per hour; this does not compare to the initial vacuum loss rate which was microns per minute (1380 micron per hour).
What happened to this chamber over the course of one day?
Well, remember how earlier we talked about permeation, outgassing, and evaporation? The vacuum loss rate decreased due two reasons:
1. The water particles stuck onto the chamber wall evaporated and as they evaporated they contributed to the increasing pressure inside the chamber. After all the water evaporated, there was no more molecules to be added to the air inside of the chamber; the vacuum loss rate decreased.
2. According to the ideal gas law (PV = nRT), which means that Pressure (P) times Volume (V) equals number of molecules (n) times Temperature (T) time the Ideal Gas Law (R). In our case, the vacuum volume (V), the temperature (T) and the number of water molecules (n) is constant and therefore the Pressure (P) will come to an equilibrium because there is only a finite number of water moisture or molecules (n) present in the chamber.
Keep in mind there are also other constituents besides water such as hydrocarbons outgassing from the acrylic polymer chains, other gasses outgassing from the Gasket Rubber and seals, oils mists, and other present inside the chamber. However, water vapor is the main contributor to vacuum loss initially.
Pumping down the vacuum chamber for a second time on Day 2
We flipped the power switch in the vacuum chamber, opened the vacuum valve, and once again started recording the absolute pressure vs. pumpdown time of the chamber. This time, we did not take a measurement every minute but every few minutes.

After about 251 minutes, which equals to roughly 3 hours, we went from 583 milliTorr to 251 milliTorr and closed the valve and let the chamber lose vacuum again. This time the vacuum loss rate averaged to about 17.5 microns per minute. This is about 25% smaller than the vacuum loss rate experienced in the first pump down. We let this chamber sit for another day to see what the vacuum would be upon our return on day 3.
Vacuum levels on day 3
After letting the chamber sit for another 18 hours, the vacuum gauge showed a vacuum level of 1.5 Torr! This equals to about an overall average vacuum loss rate of 70 microns per hour or 1.15 micron per minute!
Vacuum Chamber Conditioning
Every time the vacuum chamber is pumped down, constituents, gasses, water, and other liquids/gases get removed from the air, the vacuum chamber walls, and the whole vacuum system in general. All these constituents cause two things: 1. They prevent the chamber to go down to a lower vacuum and 2. They cause an artificially inflated vacuum loss rate in the chamber and when removed allow for a better vacuum system performance overall.
Conclusions of our Vacuum Experiments
In short, we carried out two different tests on our acrylic vacuum chamber.
The first test was carried out in August 2015 and lasted for about 3 days as we were curious what would happen to the vacuum levels of this acrylic chamber after we pumped it down to 250micron and closed the vacuum valve. Our findings were interesting, entertaining, and informative and we hope you enjoyed this write up.
The second test was carried out in May 2019 to see the maximum vacuum level achievable in 24 hour with a Varian SD-200 vacuum pump and 10 inch vacuum chamber. The vacuum achieved was 9.2 micron or 0.0092 Torr. This is an unbelievable vacuum level for an acrylic vacuum chamber.
Why the discrepancy in test results? The first test was performed in August 2015 on an acrylic vacuum chamber that was 18 inches cube inside dimensions. We used the SD-200, 7CFM at 0.0015 Torr ultimate pressure vacuum pump. Our connection hardware was 3/8 inch ID reinforced vinyl hose. The second test was performed on May 2019, we used a 10 inch cube acrylic vacuum chamber with the same Varian SD-200 Vacuum pump. Our connection hardware was a NW25 metal bellows hose.
The reason the pumpdown performance was better during our most recent test was because:
1. The vacuum chamber was smaller 10 inch cube (1000 cubic inches) vs 18 inch cube (5832 cubic inches) almost six times less volume
2. In addition to smaller volume, we used an NW25 connection to connect our vacuum pump to vacuum chamber. The difference in cross section between the 3/8 inch tube and the NW25 bellows hose is 0.29 square inch and 0.78 square inch respectively; almost 3 times larger cross section. If you think of air on a molecular level as tennis balls bouncing around in a room, under which condition will more tennis balls escape out of the room: If you open 1 window or if you open 3 windows? This is the same concept when it comes to pumpdown, a larger cross section has the ability to remove more air out of the chamber.
3. We have become a lot better making our acrylic vacuum chambers over the years. We have improved our design, our manufacturing, we have further improved our glue epoxy formula to make it more vacuum friendly, we have improved our O-Ring groove which improved our sealing between the door and the chamber. Overall, we make better chambers today than we did many years ago; in a way every business does, a Ford Mustang today is a much better car than in was in the 90’s
Ok, you are probably wondering if an acrylic vacuum chamber can go below 9.2 milliTorr? Our answer is yes, at least our customers have told us that it is possible. However, before we can make any further claims, we have to be able to support these claims with good evidence. This means that we will have to hook up a Turbomolecular Vacuum Pump to our acrylic vacuum chamber sometime in the future. When we do, we will be able to tell you the absolute limits of an acrylic vacuum chamber. Until then, hang in there, we will perform that test one day as well.
Thank you for taking the time to read our article, we have spent an enormous amount of time to write this and are always glad when people read it.
Please contact us if you have any questions, suggestions, feedback, and concerns. Your input is welcome and appreciated and it helps us to become better writers.
Thank you.
Some of our Popular Items
We treat our customers well by Over-Delivering on our Promises (reason why we are Highly Rated on Google My Business). Check out some of our other items we carry that you can combine/integrate with your systems or projects.

Complete List of Articles Related to Acrylic Vacuum Chambers