1. Introduction
On behalf of Team Sanatron, we want to thank you for using our products. It is our goal to be your partner and your trusted manufacturing advisor during your bubble leak testing procedures.
This Bubble Leak Tester has been specifically designed to enable you to perform package integrity testing, or seal quality testing, through visual inspection of bubble emissions while the specimen is submersed under water and under vacuum. It conforms to the testing protocol set forth in the:
- ASTM D 3078: Standard Test Method for Determination of Leaks in Flexible Packaging by Bubble Emission
There are other vacuum bubble leak testing procedures that this tester can be used for, the possibilities are endless.
Sanatron Makes The Only Vacuum Bubble Leak Test Chamber Robustly Designed And Quality Manufactured To Consistently Perform And Meet Your Needs!
USER MANUAL: [Document #:808873] - PDF
See our Bubble Emission Leak Testing Systems Catalog
2. Warning Notice
Every Tester is specified, designed, built, and quality inspected by us specifically for you. In order to get the most out of your Bubble Leak Tester, please take the time to fully read and understand this document.
Following this User Manual Document will:
1. Ensure an effective and efficient operation.
2. Prolong the life and quality of this equipment.
3. Maintain a safe and secure work environment.
LEGAL NOTICE: Sanatron makes no warranties applying to information contained in this document or its suitability for any implied or inferred purpose. Sanatron shall not be held liable for any errors this manual contains or for any damages that result from its use. By using this chamber or manual, the user/operator agrees to operate this chamber voluntarily, at own discretion, and at their own risk.
Operator must comply with safety instructions, observe workplace safety rules, and follow regulations issued by corresponding government agencies.
WARNING: Misuse of this equipment may result in equipment damage or personal injury.
DO NOT Make unapproved modifications to this System
DO NOT Pressurize the acrylic chamber
3. Principles of Bubble Leak Testing

1. What is Bubble Leak Testing?
Bubble Leak testing is a visual package and seal integrity testing method. The defect is visually detected through the emission of air bubbles which emanate from a defective test specimen as it is submersed under water and under vacuum.
2. How Does Bubble Leak Testing Work?
Bubble Leak testing works because there is a pressure difference between the inside of the test specimen and the outside. If the package seal is compromised, the air will go from a higher pressure (inside specimen) towards the lower pressure (ambient). If the specimen is submersed in water, this air movement will be visible by air bubbles emitting from the specimen.
3. Why is Bubble Leak Testing Performed?
Bubble Leak Testing is a very important part of quality manufacturing as it enables the manufacturer to properly test the seal integrity of sealed packages. There are several reasons:1. Quality Control: In order to consistently produce well sealed packages, a quality control system must be in place to qualify and quantify the integrity of packages and package seals.
2. Quality Engineering: Results derived from the Bubble Leak Test can be used to adjust sealing processes, sealing equipment, package sealing procedures, and sealing recipes in order to improve package quality and decrease failure rates.
3. Maintenance: Consistently practiced and performed Bubble Leak Tests can help maintenance pinpoint equipment issues which can be swiftly addressed.
4. Compliance: From a compliance and legal standpoint, the manufacturer must be able to document and prove good quality of packages and how seal integrity is tested. This is especially critical in FDA manufacturing environments.
5. Business Decisions: Bubble Leak Tests can help the manufacturer of sealed packages make executive decisions on how to proceed with regards to their packaging strategy. One example is deciding between two sealing recipes and processes – a bubble test can show advantages and disadvantages of a process and help perform a cost-benefit analysis on such process.
See our Bubble Emission Leak Testing Systems Catalog
4. Caring for your Bubble Leak Tester
1. How to Handle the Bubble Leak Tester
WARNING: HEAVY!
Consider that the smallest and lightest Sanatron Bubble Leak Tester weights 55lbs or more. Please use the proper lifting and moving equipment while moving your System. Do not try to lift this system by yourself. Use the same procedures that you would use when handling heavy equipment. Consult your on-site Safety Engineer or Material Handler if you are not sure how to move heavy and fragile equipment.
WARNING: FRAGILE!
Acrylic is fragile and will crack or craze if dropped or mishandled. You must set your bubble leak tester slowly down onto your work area. Additionally, do not hit it with sharp objects such as knifes or screwdrivers. Do not collide this system with other objects. You must handle the acrylic carefully in order to maintain it.
WARNING: SENSITIVE TO THERMAL SHOCK!
Please use ambient water temperature between 21 and 32 °C (70°F to 90°F) to fill up the acrylic tank with water. Every acrylic chamber is sensitive to sudden changes in temperature which may result in crack or crazes due to sudden thermal expansion of acrylic.
ATTENTION! DO NOT use, apply, or expose SOLVENTS to Acrylic Chambers
Solvents have the ability to attack the surface of acrylics and dissolve the polymer chains which are the building blocks or acrylic. Not only will solvents dissolve acrylic and acrylic epoxy glue, solvents will also diffuse into the acrylic and acrylic glue and weaken it.
This includes, but is not limited to: isopropyl alcohol, acetone, paint thinners, and other solvents. Please do not use this chamber for Wood Impregnation as some Wood Resins outgas and the vapor from the wood resin will attack the acrylic and the acrylic epoxy glue and destabilize the acrylic vacuum chamber.
DO NOT use this chamber to dry parts that have been cleaned with including, but not limited to: isopropyl alcohol, acetone, paint thinners, and other solvents. The solvent drying vapors will attack the acrylic and the acrylic epoxy glue and weaken the acrylic vacuum chamber.
5. How to Operate and Maintain the Vacuum Pump
Your Bubble Leak tester comes with 1 of 3 different Vacuum pump types. A rotary Vane Pump, A Venturi Vacuum Pump, or Oil Free Vacuum Pump. Each pump has its own advantages and disadvantages.
To determine which vacuum pump type is on your system, look at the serial number and refer to the table below:
| Serial Number Starts with: | Your Vacuum Pump is: |
| “LEAK-BOXEL” | Rotary Vane Vacuum Pump |
| “LEAK-BOXPN” | Venturi Vacuum Pneumatic Pump |
| “LEAK-BOXOL” | Oil Free Vacuum Pump |
1. Rotary Vane Pump
The Rotary Vane Pump must be connected to 115V 60Hz Power Source.
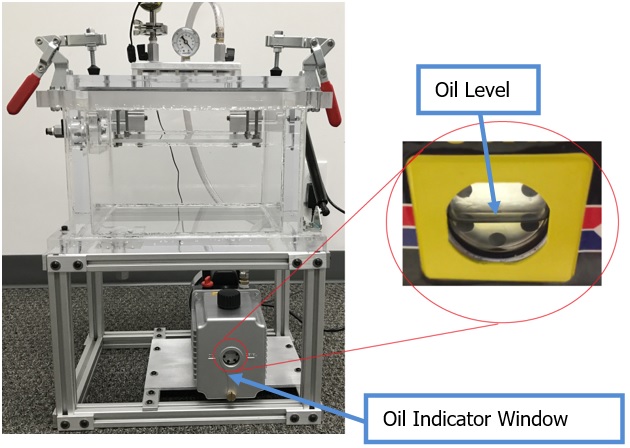
Before Turning on the vacuum pump, always make sure that there is sufficient oil present in your rotary vane pump. The Oil Level Indicator window is present on the front of the vacuum pump. See image
During your oil check you must confirm that the oil is within the appropriate level and that the oil of clear color (or slightly yellow).
The vacuum pump oil must be changed every 6 to 12 months – depending on use. If the vacuum pump is used every day, change oil every 6 months. If the vacuum pump is used once a week, change oil every 12 months.
To turn on the vacuum pump, simply flip the on Button on the back of the pump.
Please refer to the Vacuum Pump user manual for additional information on the maintenance and operations of the pump.
2. Venturi Vacuum Pump
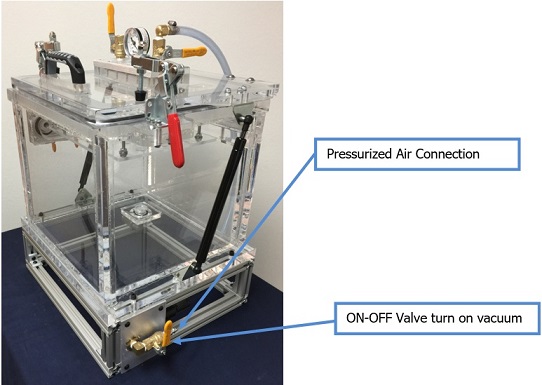
Your Venturi Vacuum pump needs to be connected to Pressurized Air of at least 80PSI at 6CFM. The pump DOES NOT require oil or electricity to run.
To turn on the Venturi Vacuum Pump, simply toggle the ON-OFF Valve open the airflow – the vacuum will be pulled.
3. Oil Free Vacuum Pump
The Oil Free Vacuum Pump must be connected to 115V 60Hz Power Source.
To turn on the vacuum pump, simply flip the on Button on the back of the pump.
Please refer to the Vacuum Pump user manual for additional information on the maintenance and operations of the pump.
6. How to Clean the Acrylic Vessel
DO NOT USE SOLVENTS such as Alcohol, Acetone, or Chemical Thinners these will Damage and Craze your Acrylic and make it opaque making it difficult for you to see bubbles.
Approved Cleaning Methods are:
1. Water and Hand Soap
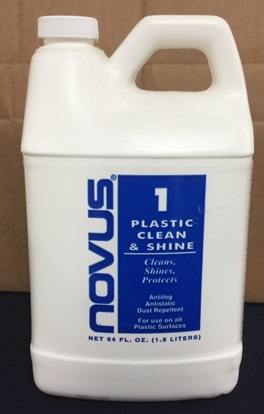
2. NOVUS, #1 Acrylic Cleaner
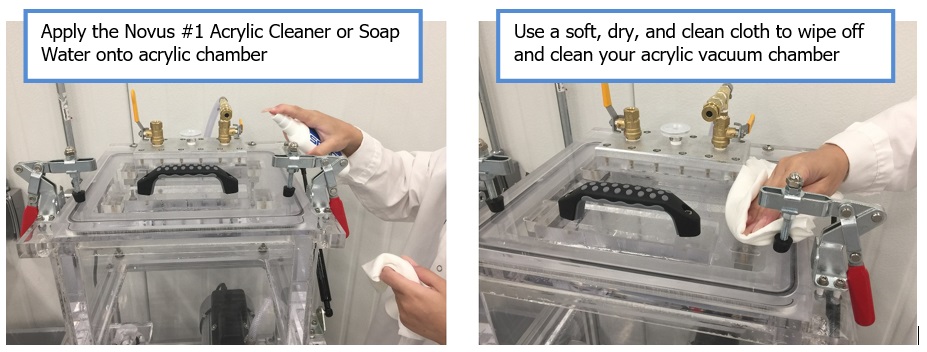
Use a lint free cloth by soaking or submersing it into water or soap water. Squeeze the water out of the cloth so that you end up with a damp cloth (containing water or soap water or #1 Acrylic Cleaner).
With the damp cloth, sweep across the acrylic surface until the dirt or dust have been picked up. Be careful not to scratch the acrylic.
Once you have swept your acrylic surface, use a dry cloth or paper towel to soak up the moisture from the acrylic surface. Finally, you can wipe off the wet surface with a dry cloth.
Finally, be sure NOT to use any soap which may contain alcohol or solvents.
See our Bubble Emission Leak Testing Systems Catalog
7. How to Operate the Bubble Leak Tester
Please take the time to familiarize yourself with the critical components before you start to operate your Sanatron Vacuum Bubble Leak Tester. This will enable you to better understand your tools and to better perform your package testing.
1. Explanation of all Components
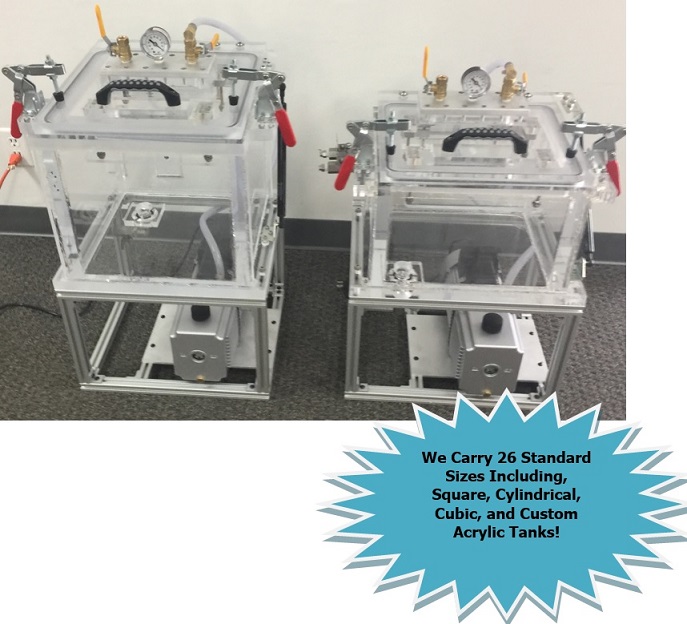
Take note that the following images are from several different systems or single components. Sometimes an image of one system is shown, other times an image represents a singled out component for better illustration purposes.
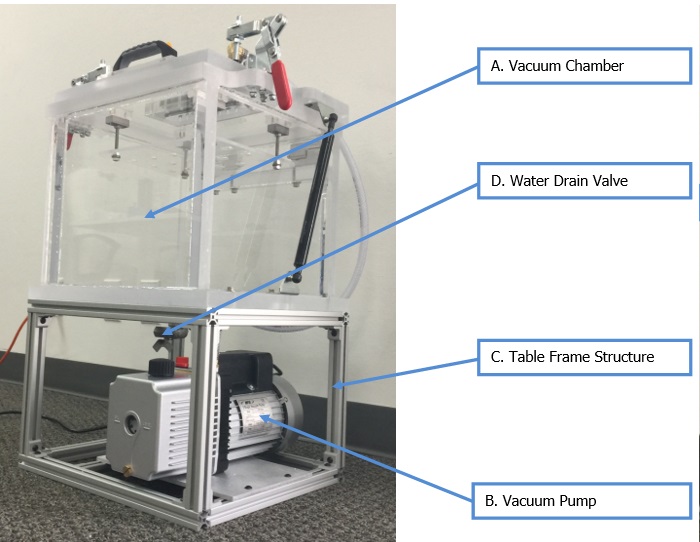
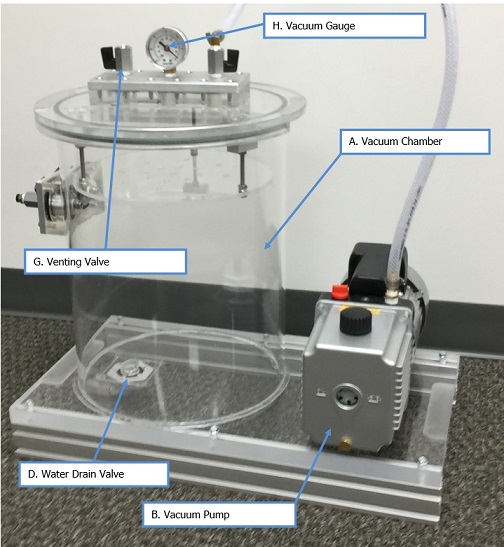
A. Vacuum Chamber - This is the main component of your system. It is an Acrylic Box made from various sizes depending on how large your specimen is. Before the test, this Acrylic Chamber is filled with water. The specimen is then submersed into the water. The Lid is closed and vacuum is pulled. The sole purpose of this acrylic box is to hold the water, the specimen, and be used as a view port for your bubbles.
B. Vacuum Pump - a vacuum pump is the instrument that creates vacuum so that a pressure difference is present which then will drive air from the higher pressure environment towards the lower pressure environment through visible bubbles if the package integrity is compromised.
There are three types of vacuum pumps that can be selected with this system.
1. Rotary Vane Pump: This is an oil sealed pump which uses a lubricant to seal the vanes and create a vacuum. The advantages of a rotary vane pump are that these types of pumps are very industrious, can pull a high vacuum, and are easy to maintain. The disadvantages are that these pumps require electricity, exhaust oil mist, and are loud and messy.
2. Venturi Vacuum Pump: This is a pneumatically powered pump. It creates vacuum through the Bernoulli Principle. The advantages of such pump are that no electricity is required, there is no maintenance necessary, there are no moving parts, and no oil mist is created. The disadvantages are that these pumps cannot pull a high vacuum and typically operate at about 28 inHg of vacuum which is about 10% less performance than the rotary vane pump.
3. Oil Free Vacuum Pump: Is a vacuum pump that is hermetically sealed and not lubricated by oil. These vacuum pump types are deployed in clean rooms or places. The advantages of an oil free pump are that no oil mist is created and a relatively high vacuum can be achieved. The disadvantages are that this pump is electrically driven and sometimes may require more maintenance than the rotary vane pump as it is not as robust.
C. Table Frame Structure - The table structure is made from T-Slots and Sets that are put together to hold the acrylic vacuum chamber and the vacuum pump in place so that the complete bubble leak testing system is in one assembly. It is essentially the frame of your bubble leak testing system.
D. Water Drain Valve - Located at the bottom of the Acrylic Tank. This valve must be closed before filling the tank up with water. Once the testing operation is complete, open this valve to drain the water out of your acrylic tank.
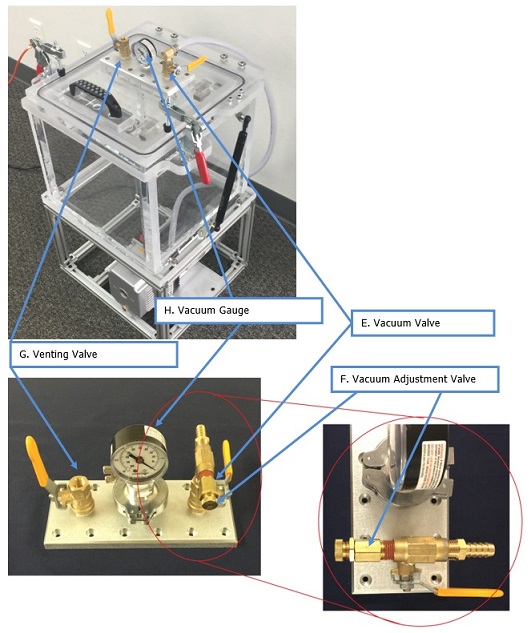
E. Vacuum Valve – a toggled ON/OFF Valve that lets the Vacuum In. When the Vacuum Valve is closed no vacuum is applied to the acrylic vacuum chamber. When the vacuum valve is open, the acrylic vacuum chamber is connected to the vacuum pump and vacuum will be pulled. You close the vacuum valve when you are done with your test and would like to vent your chamber and open the lid. On the other hand, you open the vacuum valve when you are performing your test and drawing the vacuum.
F. Vacuum Adjustment Valve – is a bleed off valve that controls the amount of air release so that a certain level of vacuum can be set. This is essentially a vacuum regulator. The adjustment valve can be tuned be turning the knob. Turning the knob clockwise will increase the vacuum (by decreasing the air release). On the other hand, turning the knob COUNTER-CLOCKWISE will decrease the vacuum (by increasing the air release). Additionally, there is a locknut that can be tightened after a certain vacuum has been set in order to prevent unintentional changes to the vacuum regulation.
G. Venting Valve – a toggled ON/OFF Valve. This valve is mainly used to hold the vacuum inside the chamber and to vent the vacuum from the chamber. Additionally, this venting valve can also be used as a vacuum regulation valve simply by not fully closing the venting valve, but by tilting the valve to a certain angle until the correct vacuum level is present. To vent the vacuum from your vacuum chamber completely, simply open the venting valve fully until all vacuum has been released. Your chamber is fully vented once air gushing sound can no longer be heard and the vacuum gauge indicator needle is on “ZERO”.
H. Vacuum Gauge – A dial vacuum gauge that shows the vacuum inside the chamber in a dual scale from 0 to 30 inHg and from 0 to 100kPa. It comes with a 2-3-2% accuracy. This means that the gauge is 2% accurate from 0 to 7.5inHg of Vacuum, 3% accurate from 7.5 to 22.5 inHg, and 2% accurate from 22.5inHg to 30inHg. The vacuum gauge can be calibrated upon request. Additionally, a quick release gauge can be purchased so that the vacuum gauge can be sent in for calibration.
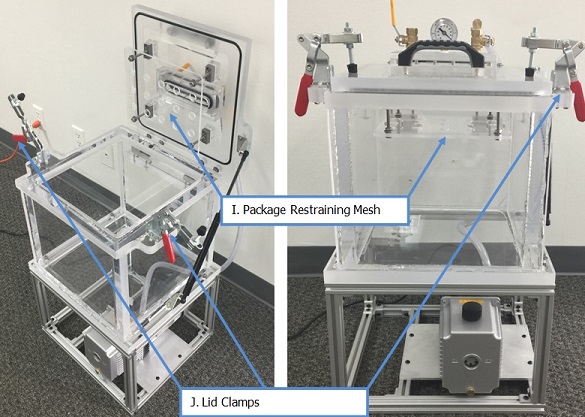
I. Package Restraining Mesh – This Mesh keeps the package submersed under water once the vacuum starts getting pulled and the specimen expands and starts to buoy upwards. Without this restring mesh, the inflated test specimen would simply rise up towards the surface and any bubble emission would not be visible. Thanks to the package restraining mesh, the specimen is kept under water so that bubble leaks can be visually detected.
J. Lid Clamps – The lid clamps push down the lid and compress it to the O-Ring so that vacuum can be drawn inside the chamber. The clamps provide the initial hold down force; once a little bit of vacuum is present, the ambient pressure will hold the lid down on its own.
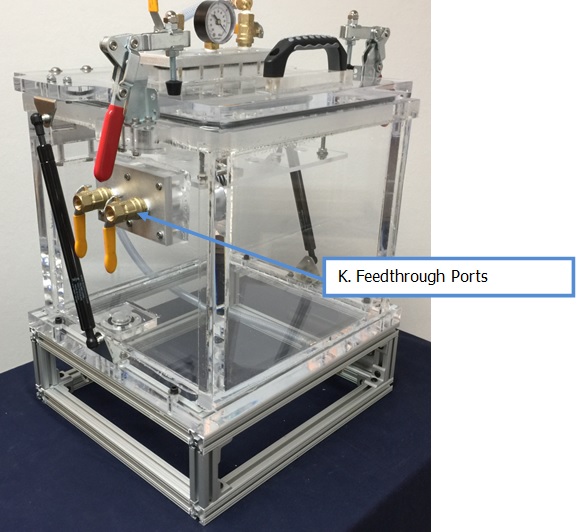
Feedthrough Ports– [OPTIONAL] - This is an optional component that can be ordered additionally. This enables two feedthrough ports to run either, air, pressurized air, water, or oil from the outside to the inside of the chamber. This can be useful if additional pressure is required to be added to the specimen or if internal pressurization tests are being performed.
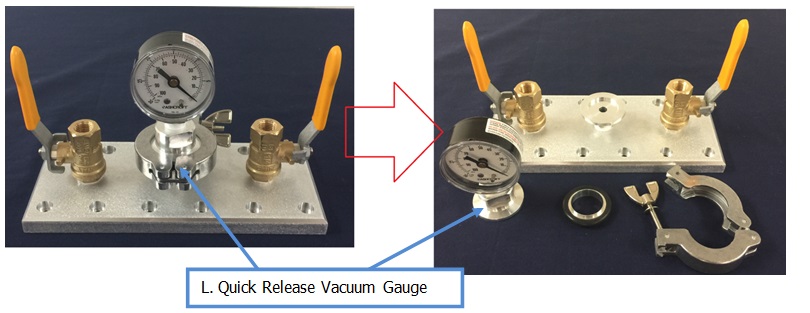
L. Quick Release Clamp for Vacuum Gauge Calibration – [OPTIONAL] - This quick release clamp is an optional addition to your bubble leak tester. This comes in very handy when vacuum gauge calibration is critical such as in a controlled manufacturing environment (FDA). Simply, untie the wing bolt and open the clamp. Now the gauge can be quickly disconnected and sent out for periodic calibration. If you order this item, your bubble leak tester will come with a quick release vacuum gauge, centering ring, clamp, and a fully calibrated vacuum gauge including a CALIBRATION CERTIFICATE valid for one year.
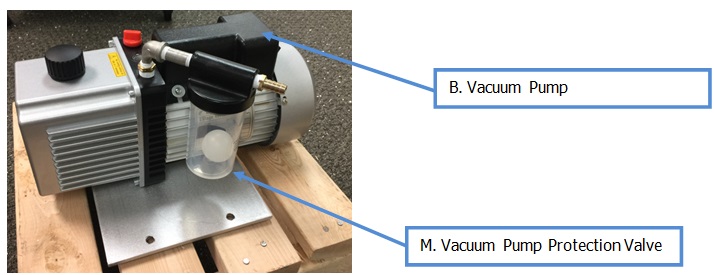
M. Vacuum Pump Protection Valve - [OPTIONAL] – There are instances where the tank is overfilled with specimen causing the water to rise. Once the vacuum is applied, the water level may rise even higher causing it to be pulled into the vacuum pump. This Vacuum Pump protection valve will close the vacuum pump once a certain amount of water has entered the protection tank stopping any water from going into the vacuum pump and protecting it from damage.
8. How to Perform Your Bubble Leak Test
Step 1: Place the Bubble Leak System onto a Flat Surface. If your table structure has casters on them, make sure that the casters are locked.
Step 2: Connect your Vacuum Pump to Electricity. Depending on your Voltage Requirements, it will either be 110VAC or 220VAC. If you have the Venturi Vacuum Pump, please connect this pump to a pressurized air supply of at least 80PSI at 6CFM.
STEP 3: Close your Tank Drain Valve.
STEP 4: Fill the Acrylic Tank with Water. Please be sure to use room temperature water as acrylic is sensitive to thermal shock.
NOTE: Be Careful not to overfill the Acrylic Tank with Water in order to prevent water being pulled into the pump.
STEP 5: Load your acrylic Tank with testing specimen. These can be bags, pouches, bottles, cans, or anything else that has air inside and will emit bubbles if there is a leak and a pressure difference.
NOTE: Once again, be careful not to overfill the Acrylic Tank with Water as additional specimen added to the tank will raise the water level of the tank. This is to prevent tank water being pulled into the pump.
STEP 6: Close the Lid and Clamp it down so that the package restraining mesh is pushing your specimen under water.
NOTE: Look at your water level, it cannot be too high – otherwise water will be pulled into the pump.
STEP 7: Close the Venting Valve and open the Vacuum Valve.
STEP 8: Turn the vacuum pump on by either flipping the switch for electrical pumps or by toggling the ON-OFF air valve of your Venturi Vacuum Pump.
STEP 9: As the vacuum is being pull down, adjust your vacuum adjustment valve to your desired level.
NOTE: Once the Vacuum has reached less than 17inHg of Vacuum, you will notice water and oil mist emitting from the Rotary Vane Vacuum Pump. In order to prevent it, you will need to go with an Oil Free Pump
STEP 10: Once you have reached your desired vacuum level, watch the specimen expand. Look for Bubbles emitting from your specimen.
NOTE: Bubble Emission Indicates a Leak. Sometimes specimen may not expand.
STEP 11: Close the vacuum valve - Open the venting valve - Release the vacuum - Open your Lid – Rotate your specimen 180 Degrees so that the part that was on the bottom is now on the top and vice versa.
STEP 12: Close the Venting Valve – Open the vacuum Valve – Reach your desired Vacuum Level
STEP 13: Watch for Bubble Emissions. Sometimes the bubble emissions may be small and you would see one bubble emitting every 5 seconds. This still indicates a leak.
STEP 14: Close the vacuum Valve, Open the venting valve, and let the vacuum vent out. Unclamp the clamps and open the lid.
STEP 15: Take out your test specimen, open the pouch, and look for water, liquid, or moisture present. Sometimes you may miss the bubble emission; however, as the air comes out, the water may come into your specimen. If there is water present, this may indicate a leak.
STEP 16: Note or record your test results and move onto the next sample.
Congratulations, you have successfully performed your bubble leak test!
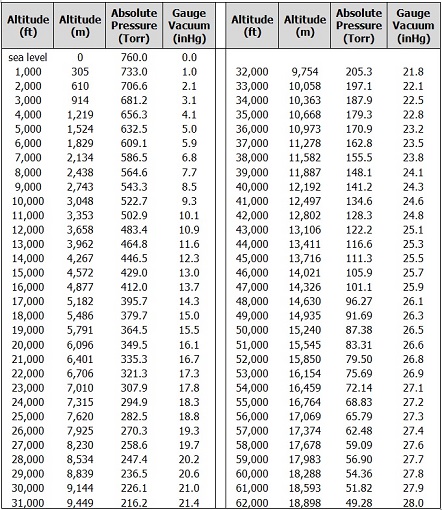
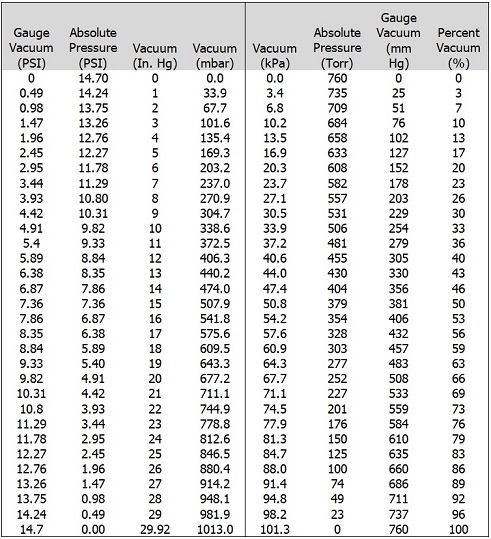
9. Conversion Tables
1. Pressure and Vacuum Conversion Table
2. Altitude vs. Pressure Conversion Table