What is Force Decay Leak Testing?
Force Decay Leak Testing is a very popular quantitative leak testing method used to quality test package and product integrity due to its ability to detect small leaks which cannot be seen through visual inspection. In this method, the test specimen is internally inflated by either internal pressurization or vacuum force. The inflated test specimen will, in turn, apply a force on a pressure transducer. Finally, the change in force applied by the inflated specimen over a specified time is observed.
Force Decay Quality Testing is one of the many leak testing methods available to you when it comes to detecting product leaks. Force Decay Leak Testing is considered a non-destructive test as the test does not alter or destroy the specimen. If the force decay test is a pass, the specimen does not need to be discarded and can be placed back into the batch since no damage has been done to the product as a result of the leak test.
Force Decay leak testing method will only work on flexible, expandable, or inflatable packages. Force decay testing method is also very popular among blister packages, catheters, and syringe testing.
Rigid packages do not expand and therefore are not a good candidate for the force decay method. Force Decay leak testing will not work too well on porous packages as these may lose too much air during evacuation and therefore not give you good signal to noise ratio.
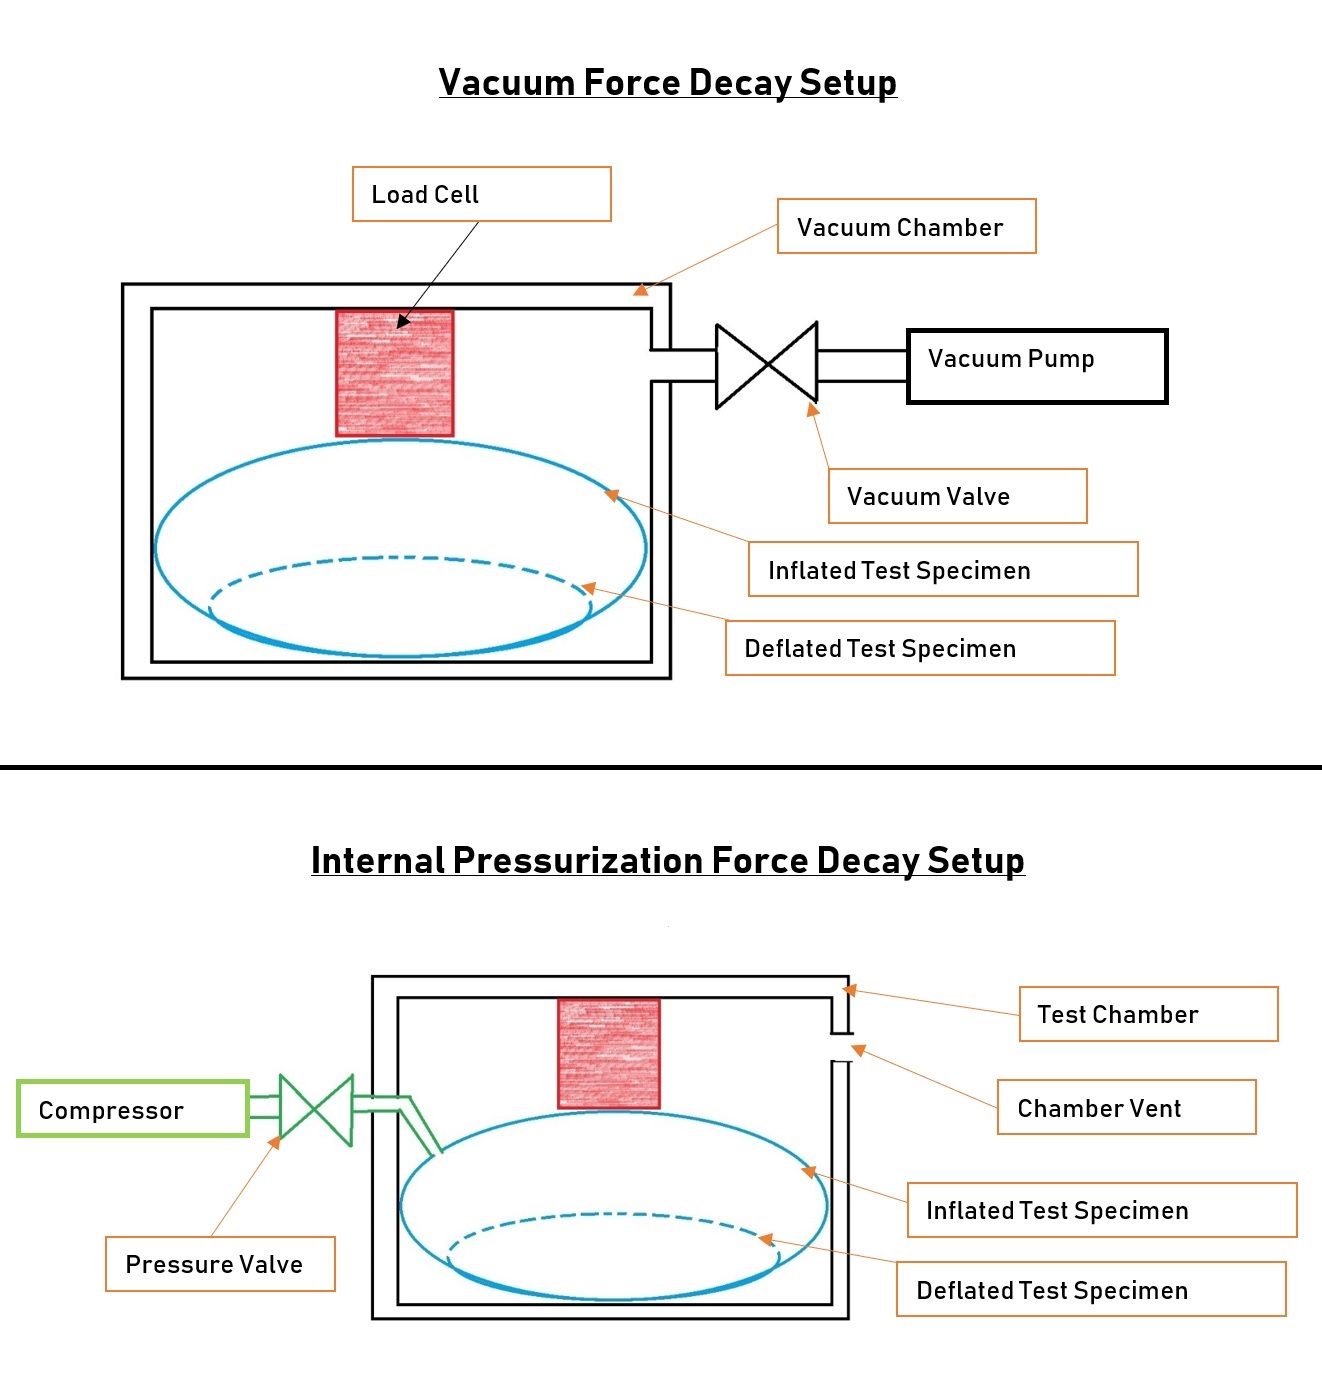
Force decay is performed by either expanding a sealed product by placing it inside a vacuum chamber or by internally pressurizing the specimen through application of additional pressure.
Keep in mind that Force Decay Test Methodology is very similar to the Pressure Decay and the Vacuum Decay Test.
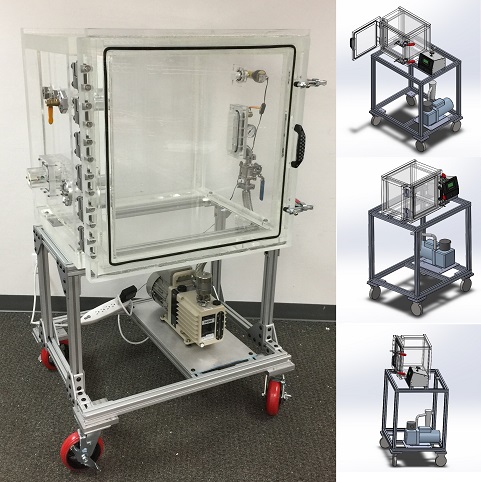
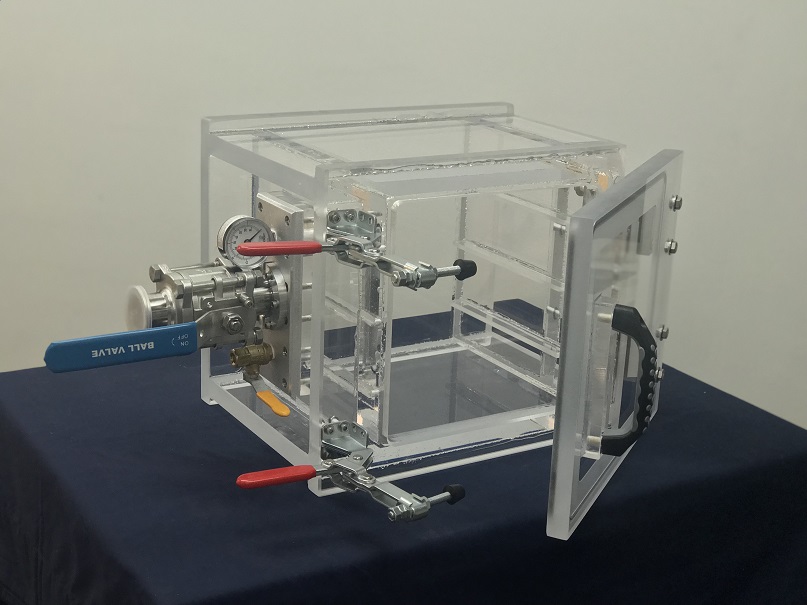
Force Decay Leak Test Experimental Setup
[Click on Image to Enlarge]
A force Decay Test System consists of the following items:
1. A Vacuum Chamber: Into which the flexible test pouch is placed.
2. A Load Cell: which reads the force applied to it and converts this force into electrical signals
3. Vacuum or Pressure Valve: Which is used to enable the Filling and Venting Process
4. Vacuum Pump or Compressor: Used as a driver to inflate the test specimen.
The principle of the force decay setup is the same for the vacuum force decay setup and the internal pressurization force decay setup. The only difference is the method which is used to inflate the test specimen. The vacuum Force Decay Setup uses a vacuum chamber to generate a pressure difference between the inside and outside of the test specimen. On the other hand, the internal pressurization force decay test setup does not require a vacuum chamber because the test specimen is pressurized by a pressure line.
There is no right answer on which setup should be used for your application. However, the advantage of the vacuum force decay setup is that the test specimen is sealed and not altered during the test meaning that it is a non-destructive test. The internal pressurization setup uses a septum to puncture the sample so that pressure can be applied to the specimen. The advantage is that a pressure much greater than 15psi can be applied to the test specimen during the internal pressurization test because the vacuum test is essentially limited to 15psi at sea level because that is what the maximum amount of pressure can be achieved with a vacuum test.
It should be noted that some test specimen may have ports already installed, Medical IV Bags come to mind, which means that an internal pressurization force decay leak test may actually be a non-destructive test here since connecting the IV Bag ports to a pressure line would enable to experimenter to apply internal pressure to the specimen without puncturing it.
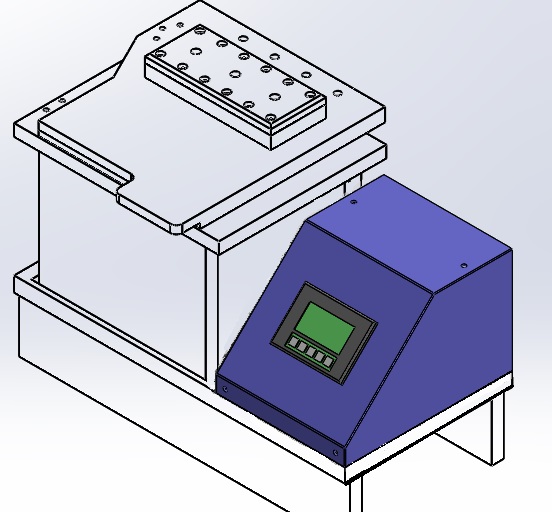
How Force Decay Leak Testing Works
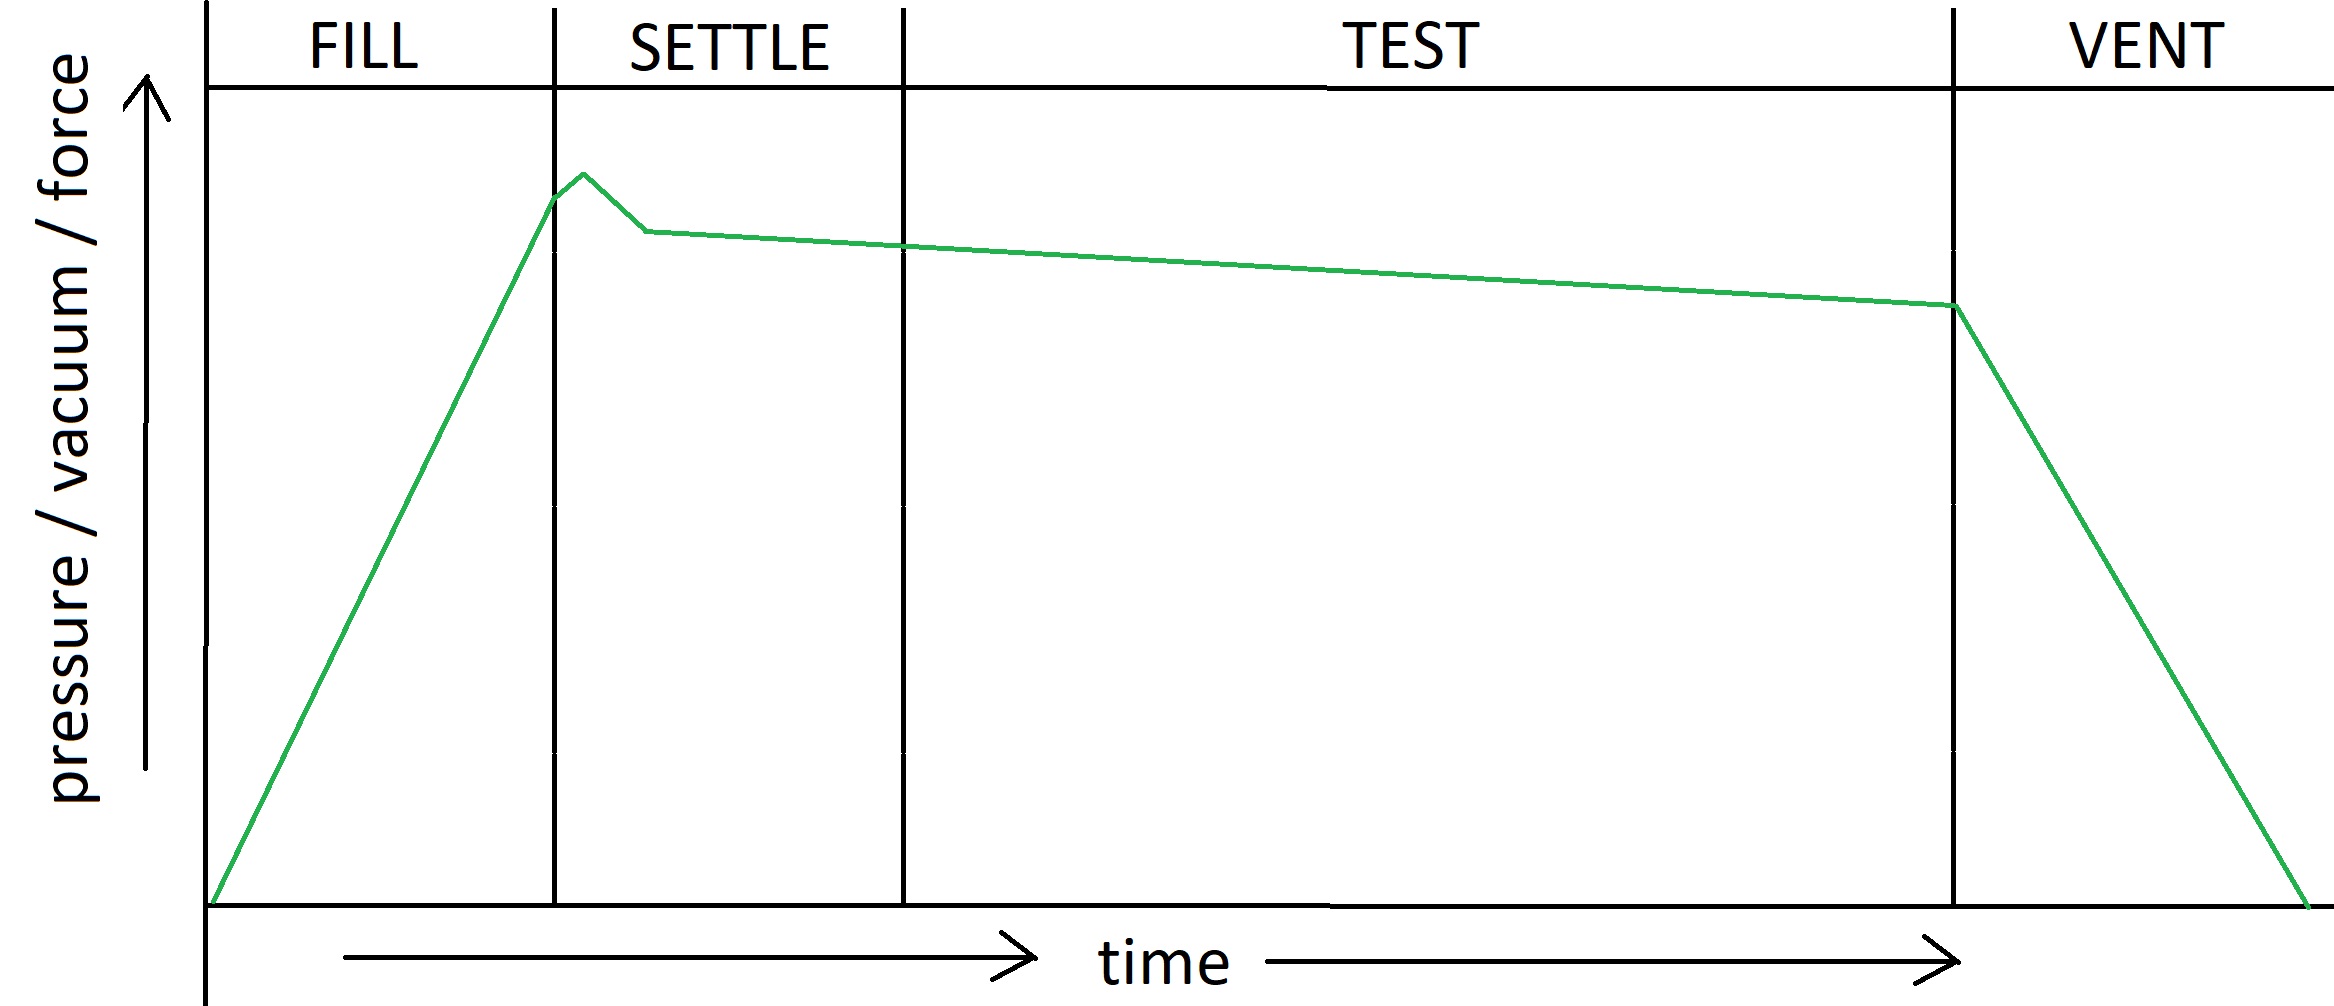
[Click on Image to Enlarge]
The whole test can be summarized in four steps: 1. Filling, 2. Settling, 3. Testing, 4. Venting. The test specimen is leak tested during Stage 1, 2, and 3. We have a separate write up dedicated specifically to the behavior and the Anatomy of the Force Decay Test Curve where you can read more about it here.
For the sake of staying on subject, all you need to take away from this is that the test is performed in four main stages where the force is measured and recorded over time giving you a force vs. time plot. We encourage you to read more about the Anatomy of the Force Decay Test Curve after you have finished reading this article.
The testing specimen is placed into the vacuum chamber, the lid is closed, and the start button is pressed to begin drawing a vacuum. As the vacuum is drawn, the sealed flexible package will begin to inflate due to the fact that the pressure inside the pouch is larger than the pressure outside of the pouch. You can now see why rigid packages are not a good candidate for force decay tests; rigid packaging does not inflate when vacuum is applied.
When a flexible package inflates, it will start to apply a certain amount of force onto the load cell. We all know that Pressure equals Force applied over an area. Once a certain vacuum level is reached, it will correspond to a certain force applied to the load cell. Hence, the force applied onto the load cell by the inflated specimen is proportional to the pressure differential between the inside of the test specimen and the vacuum chamber (outside of test specimen)
The vacuum valve is closed and the force on the load cell is recorded over a certain amount of time (say 30 seconds). If a leak exists on the seal of the flexible package, the air from inside will travel through this leak path towards the outside of the specimen. As this happens, the pressure inside the pouch will begin to decrease. In turn, the force applied to the load cell will decrease. This decrease will be noticed and measured and leak will be detected if a certain amount of force has decayed over time.
Sensitivity of the Force Decay Test
How sensitive and accurate is the force decay leak test? The Force Decay Leak test has the ability to detect holes which are the size of 25µm.
The Vacuum Force Decay Leak Test Sensitivity is 0.5*10-4 (atm*cc/s). Conversely, the Internal Pressurization Force Decay Leak Test Sensitivity is 10-4 (atm*cc/s)
This makes the Force Decay Leak test slightly more sensitive than the bubble leak test at 10-3 (atm*cc/s) with the ability to detect hole sizes of 25µm.
However, unlike the Water Immersion Bubble Leak Test, the ability to detect smaller or larger leaks is not compromised based on which leak is being tested for.
How to choose between Vacuum vs. Internal Pressurization Force Decay Leak Testing
As stated before, there is no right answer. Which way to go will depend on your test requirements and goals. However, in order to make your choice easier, there are several guidelines that one should follow.
First, given the choice, ALWAYS choose a non-destructive test over a destructive test. The answer is obvious. A non-destructive test is first less costly and repeatable. Second, if the test specimen has an access port of some way such as an NPT or luer lock, choose an internal pressurization test because the port has to be plugged anyways in order to create a pressure difference. However, an internal pressurization test will enable for a greater pressure range. Third, always choose the easier, more simpler test for the operation. Do not complicate the testing procedure. This means that if you have a heat sealed pouch, choose the vacuum force decay leak test because the test steps will simply involve placing the test specimen into the vacuum test chamber and pressing the start button.
To summarize, choose a non-destructive and simple to follow test.
Advantages of Force Decay Leak Test Method
Ok, lets move one and talk about the advantages and shortcomings of a force decay leak tester; we list these below:
Objective
This test is objective as it does not depend on the operator to pass or fail the test specimen. The PASS decision is made by the algorithm and setpoints.
Repeatable
This force decay test is repeatable because the test protocol is programmed into the testing unit. There is no difference between operators or personnel performing the leak test.
Simple
The test is operator independent and can be performed with minimal training. The test specimen is loaded, the test chamber is closed, a start button is pressed, and the test result is determined within a minute.
Compliant and Validated
The testing machine can be validated and can become regulatory compliant.
Fast
Most Force Decay Leak Tests are performed in short time frames between 30 seconds and 2 minutes.
Good Value
Considering the Test Objectivity, Repeatability, Simplicity, Compliance, and Speed, the Force Decay Leak Test is a very cost-effective leak testing method.
Great Choice for In-Process Testing
The Force Decay Leak Test is ideal for in-process leak testing during manufacturing operations since the test is generally non-destructive, objective, simple, and validated. By simply taking a test specimen, placing it into the test chamber, and pressing the button, a test result can be derived within minutes. This test helps the manufacturing operations keep making good quality parts and products.
Disadvantages of the Force Decay Leak Test Method
Can not Locate the Leak
Rather the leak rate of the whole package is tested. In order to locate the leak, follow up test would have to be implemented such as a bubble leak test or a helium sniff test.
Initial Setup Required
The Vacuum Force Decay Leak Test Requires initial setup of tooling, jigs, and assemblies in order to get the leak testing system dialed in for in process testing.
Pressure Limitations
Vacuum Force Decay Leak Test is limited to about 15 psi at sea level. Sometimes even lower pressures are achieved if the test is performed at higher altitudes. On the other hand, the internal pressurization force decay leak test is limited to shop air pressure which in most manufacturing plants is somewhere between 80psi to 120 psi.
Costlier than Bubble Leak Test
The sensitivity of the Force Decay Leak Test is in the order of 0.5*10-4 (atm-cc/s)which is comparable to a bubble leak test of 10-3. These two testing methods are very similar when it comes to sensitivity; however the force decay leak test is more expensive.
Well, this concludes our write up on the Force Decay Leak Tester. Thank you for taking the time to read what we had to say. If there is something that you would like to ask us about, please CONTACT US. Also, let us know how we can improve.
Are you researching a way to leak test your product? If you are, Let Us Know, we may be able to better assist you finding what you need.
Similar Items
We treat our customers well by Over-Delivering on our Promises (reason why we are Highly Rated on Google My Business). You should check out some of our other items we carry; click on the links below.